DMARC, DKIM, and SPF Setup for Small Business: Step-by-Step Checklist
81.6% of B2B senders are operating without a published DMARC record. Google and Yahoo enforced authentication requirements in 2024. If your domain has no DMARC record, your marketing emails face algorithmic rejection regardless of content quality, list health, or subject line. This guide fixes that without an IT department.
Key Findings
- Only 7.6% of B2B senders have advanced DMARC to quarantine or reject level. The rest are monitoring failures without acting on them.
- The SPF 10-lookup limit is the most common silent authentication failure for SMBs adding multiple SaaS tools to one domain.
- Brands with full DMARC enforcement see a 38 percentage point improvement in inbox placement over unauthenticated competitors.
- New unauthenticated domains face an immediate 30-point inbox placement penalty from receiving algorithms before a single message is evaluated for content.
- A 2048-bit DKIM key is the minimum standard for 2026. 1024-bit keys are rejected by some enterprise receiving servers.
Why Most SMBs Fail Email Authentication
The failure is not ignorance. Most small business owners have heard of SPF and DMARC. The failure is the moment they log into GoDaddy or Cloudflare, see a screen of TXT records with values like v=spf1 include:_spf.google.com ~all, and close the browser. The DNS panel looks like a place where mistakes break things permanently. So nothing gets configured.
The good news is that DNS records are additive. Adding a TXT record does not overwrite existing mail configuration. It adds a policy layer on top. A mistake in a TXT value causes the policy to fail silently, not the mail to stop flowing. Fixing it is a matter of editing the record and waiting for propagation.
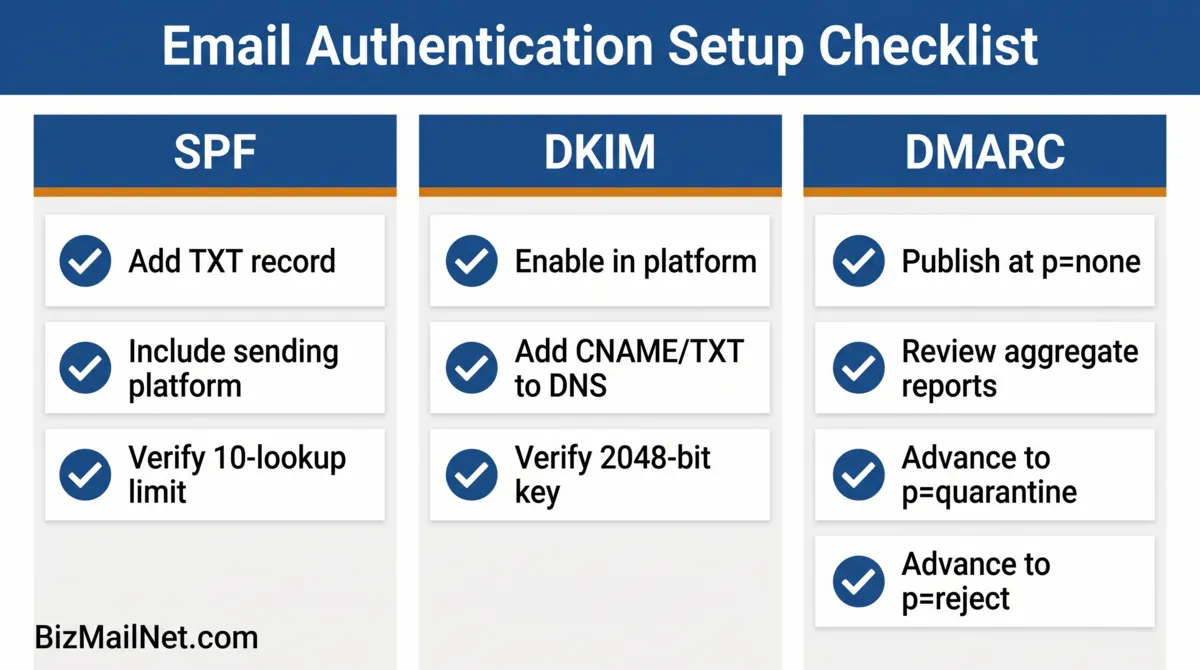
The three protocols work as a stack. SPF authorizes the servers sending on behalf of your domain. DKIM signs each outgoing message with a cryptographic key. DMARC enforces what happens when either check fails and generates reports showing you what is passing and what is not. All three must be in place before any one of them provides full protection.
SPF: Authorizing Your Sending Servers
SPF is a DNS TXT record at your root domain that lists every server authorized to send email on your behalf. When a receiving server gets a message claiming to be from your domain, it checks the SPF record. If the sending server is on the list, SPF passes. If not, it fails, and the probability of spam folder routing rises.
include: statement counts as one lookup. Source: MarketBetter, 2026.Adding the SPF Record
Go to your domain registrar's DNS management panel. Add a new TXT record at the root domain (either @ or your domain name depending on the registrar). The value depends on your email platform:
| Platform | SPF Include String |
|---|---|
| Google Workspace | v=spf1 include:_spf.google.com ~all |
| Microsoft 365 | v=spf1 include:spf.protection.outlook.com ~all |
| Mailchimp | v=spf1 include:servers.mcsv.net ~all |
| Brevo | v=spf1 include:spf.sendinblue.com ~all |
| ActiveCampaign | v=spf1 include:emsd1.com ~all |
| HubSpot | v=spf1 include:_spf.hubspot.com ~all |
If you use more than one platform to send email, combine the include strings in a single record: v=spf1 include:_spf.google.com include:servers.mcsv.net ~all. Each include counts as one lookup toward the 10-lookup limit. If you are using four or more platforms, check your total lookup count using MXToolbox's SPF record lookup before publishing.
The ~all vs -all Decision
~all (softfail) marks unauthorized sends as suspicious but allows delivery. -all (hardfail) rejects unauthorized sends entirely. Start with ~all until you have confirmed all legitimate sending sources are included. Move to -all only after DMARC is at p=reject and reports show no false failures.
DKIM: Signing Your Outgoing Messages
DKIM adds a cryptographic signature to every email your platform sends. The receiving server verifies the signature against a public key stored in your DNS. A valid signature confirms the message originated from your domain and was not modified in transit.
Enabling DKIM Per Platform
Google Workspace: Go to Admin console, then Apps, then Google Workspace, then Gmail, then Authenticate email. Select your domain and click Generate new record. Add the TXT record shown at the name google._domainkey.yourdomain.com. Wait 24 hours, then click Start authentication.
Microsoft 365: Go to Microsoft 365 Defender, then Email and collaboration, then Policies and rules, then Threat policies, then DomainKeys Identified Mail. Select your domain and toggle DKIM to enabled. Add the two CNAME records shown to your DNS. Microsoft generates the keys automatically.
Mailchimp: Go to Account, then Domains, then Authenticate. Mailchimp provides two CNAME records to add to your DNS. After adding both, click Authenticate. The status updates within 48 hours.
After adding the DNS record, verify using MXToolbox: go to mxtoolbox.com, select DKIM Lookup, enter your domain and the selector string your platform provided (e.g., google for Workspace, k1 for Mailchimp). A passing result shows "DKIM Record Found."
DMARC: Enforcement and Aggregate Reporting
DMARC adds two things SPF and DKIM cannot provide on their own: a policy for what to do when authentication fails, and aggregate reports showing you what is passing and what is not across all receiving servers.
Publishing the DMARC Record
Add a TXT record at _dmarc.yourdomain.com with the following value to start:
v=DMARC1; p=none; rua=mailto:[email protected]
Replace [email protected] with an address you will actually check. This mailbox receives aggregate XML reports from Google, Microsoft, Yahoo, and other major providers showing which messages passed or failed and from which IP addresses.
The 13-Week DMARC Rollout
Weeks 1 through 4 (p=none): Monitor aggregate reports. Confirm SPF and DKIM are passing for all legitimate sends. Look for any failing sources that should be authorized and fix them before advancing.
Weeks 5 through 8 (p=quarantine, pct=25): Change the policy to p=quarantine; pct=25. This applies the quarantine policy to 25% of failing messages. Watch reports for any legitimate sends now hitting quarantine. If none appear, increase pct to 50, then 100 over the following weeks.
Weeks 9 through 13 (p=reject): Once quarantine is stable at pct=100 with no false failures, change to p=reject; pct=100. Unauthenticated mail from your domain is now blocked entirely rather than routed to spam.
After publishing DMARC at p=reject, run a full seed list test to confirm marketing sends are still reaching the inbox across providers. The setup guide continues in the seed list testing guide.
Platform Walkthroughs: Common Configuration Errors
GoDaddy
GoDaddy's DNS manager uses a form-based interface. When adding a TXT record, the Host field should contain @ for root domain SPF records and _dmarc for DMARC records. The most common error is entering the full domain name in the Host field (e.g., yourdomain.com), which creates a duplicate subdomain like yourdomain.com.yourdomain.com. Use @ for root-level records.
Cloudflare
Cloudflare automatically appends the domain to DNS record names. Enter _dmarc in the Name field rather than _dmarc.yourdomain.com. For DKIM CNAME records, enter only the selector portion (e.g., google._domainkey) without the domain. Cloudflare handles proxying for other record types but DNS TXT records are always DNS-only. Never proxy a TXT record through Cloudflare's CDN.
Namecheap
In Namecheap's Advanced DNS panel, TXT records use @ for the root domain. The TTL can be left at Automatic. After saving, changes typically propagate within 15 to 30 minutes at Namecheap's nameservers. Use the MXToolbox SPF check immediately after propagation to verify the record reads correctly before testing with Mail-Tester.
DNS Validation Command Generator
Select your operating system and email platform to generate the exact terminal commands needed to verify your DNS records without third-party tools.
FAQ: DMARC, DKIM, and SPF Setup for Small Business
SPF allows a maximum of 10 DNS lookups per record evaluation. If your record includes multiple third-party senders (CRM, support desk, marketing platform), you can exceed this limit, causing the entire SPF check to fail. Fix it by flattening nested includes, using a subdomain for marketing sends, or using an SPF flattening service that converts nested includes to IP addresses and reduces lookup depth.
Always start at p=none. This monitors authentication failures and sends aggregate reports to your specified email without blocking or filtering any mail. After reviewing several weeks of reports and confirming all legitimate sends are passing SPF and DKIM, move to p=quarantine. After 30 clean days at quarantine, advance to p=reject.
DNS records typically propagate within 15 minutes to 48 hours depending on the TTL settings at your registrar. Most changes resolve within an hour at major providers. Do not run verification tests until at least 30 minutes have passed after adding a record. If MXToolbox shows the old value after an hour, check that the record was saved correctly and that there is no conflicting duplicate record.
Yes. Modern domain registrars provide graphical DNS management interfaces where you add TXT records using a form. The values to enter come directly from your email platform's documentation. The process requires following instructions carefully, not technical expertise. The most common errors are formatting mistakes in the TXT value or entering the full domain name in the Host field when only the subdomain prefix is needed.
A DKIM selector is a label that identifies which DKIM key to use when verifying a signature. Your email platform provides the selector string along with the DNS record value when you enable DKIM. Google Workspace uses 'google' as the default selector. Mailchimp uses 'k1' and 'k2'. The selector appears in the DNS record name as 'selector._domainkey.yourdomain.com'. Use this exact format when running an MXToolbox DKIM check.
Sources
- Forrester. B2B Email Deliverability Benchmarks. Via The Digital Bloom. 2025. thedigitalbloom.com
- MarketBetter. B2B Email Deliverability Guide 2026. 2026. marketbetter.ai
- Leadfeeder. B2B Email Marketing Guide. 2026. leadfeeder.com
- Reddit. r/sysadmin. Need a crash course in setting up DKIM, DMARC, etc. 2026. reddit.com (anecdotal)
- Prospeo. SPF, DKIM, DMARC Explained: 2026 Setup Guide. 2026. prospeo.io (vendor source)